Hey Iron-on-Inkers!
Allison here with February Blank of the Month project for you! This month we are featuring a beautiful double sided Heart Ornament that is PERFECT for Valentine's Day which is right around the corner!

Let me help you get inspired by my tutorial and be sure leave a comment below!
Materials & Tools for Heart Shaped Ornament:
Materials:
- Sublimation Markers
- Heart Shaped Ornament
- Plain Copy Paper
- Isopropyl alcohol
- Heat Tape
- Protective Paper
- Sublimation Stamp Pad
- Acrylic Stamp Block
- Floral Cling Stamps
- Mirrored Similar "You are Loved," Cling Stamp
Tools:
- Heat Press, Dry Iron or Home Iron
- 5X7 Gel Press Plate
- Protective Project Mat
- Pencil
Step by Step Tutorial:
Step 1. Trace your Heart Shaped ornament onto plain copy paper.

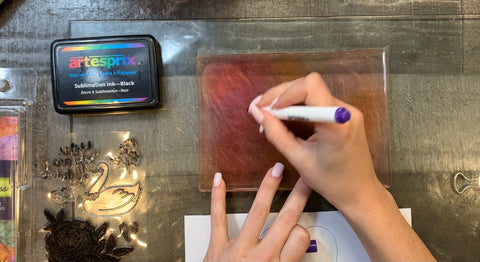
Step 2. Choose your Iron-on-Ink Sublimation Marker and color directly onto your Gel press plate. Use as many colors as you would like.
Step 3. Quickly squeeze your IPA across the Gel Press plate and place your plain piece of copy paper on top of your Gel Plate.


Step 4. Lift off your paper from your Gel Press plate and wait for it to dry. Take your Sublimation Ink Stamp Pad and cling stamp of choice to stamp onto your Gel Press Plate. I chose a mirrored, "You are Loved," cling stamp. Lay your piece of copy paper on top of your press stamp (within the heart shaped ornament traced area) on your Gel Press plate. Lift your paper to see your mirrored stamp on your copy paper.


Step 5. Take your Iron-on-Ink markers of choice and add more detail to your stamped design.

Step 5. Take your floral cling stamps of choice, cling them on acrylic stamp block, and then press them onto your paper within your heart shaped ornament.

Step 6. Secure your Heart Shaped ornament blank you your design using Artesprix Heat Tape.

Step 7. Create an Artesprix Sublimation Sandwich. One piece of Protective Paper on top of your blank and one piece on the bottom of your blank. Be sure that your design is face down to your blank, but on-top of your Sublimation Sandwich.

Step 7. Place you project in the Sublimation Sandwich on to your Protective Project Mat. Set your Home Iron on the highest heat setting and lay it down on your Iron-on-Ink design for 3 minutes. ***Pro Tip: Do not move your iron during this time, if you need to make sure you lift up and place your iron back down in a, "tile form," motion.

Step 8. After your timer has gone off do an Artesprix Peak Test. Before removing any heat tape from your blank take a peak and make sure that your design transferred vibrantly and clearly! If it did not, double check your time, temperature and pressure and give it another try! ***Pro Tip: By checking your design before you remove you tape you will ensure that if you need to give your project another press that the design will still be set in place and not have a ghosting design.***
Step 9. The BIG REVEAL! Enjoy your beautiful Iron-on-Ink Valentine's Day project! Be sure to add the pretty red ribbon from your Artesprix packaging. This turned out gorgeous!

We can't wait to see you Blank of the Month February Heart Shaped Ornament. Don't forget to take advantage of this double sided ornament and complete this project on the other size of you blank!
Be SURE to check out my last Blank of the Month Wine Bag project and Courtney's beautiful Artesprix Picture Frame! We have SO many amazing projects on the blog it's hard to pick just one!
Happy creating!
Artesprix Allison
Comments