Hello! I’m Alison Heikkila and I’m happy you stopped by the Artesprix Blog. Decorating shirts is something I have done since I was a child, and it never gets old. I used to use things like puffy paint, rhinestones, and lamé. Now, I use Artesprix’s line of Iron-on-Ink and I can do so many things I couldn’t do before. For example, my T-Shirt project uses a pretty assortment of stamps from Hero Arts that is perfect to wear in the Spring.
*Affiliate links are used in this post. That means that if you shop through these links, I may receive a small compensation, at no cost to you. For more information, please see my Affiliates page, where I also have some coupon codes.

What is Artesprix Iron-on-Ink?
Artesprix Sublimation Markers, Ink, and Paint are specially formulated to allow you to use basic copy paper to: color, stamp, stencil, and monoprint anything you wish and turn it into a heat-transferable design. These designs are then applied to a polyester or polyester coated substrate with heat and pressure. You can use a heat press or a home iron! These designs, through this process of sublimation, will become permanent on your substrates.
T-Shirt
Sublimation Stamp Pad in Black
Original Sublimation Markers
Sublimation Markers- Bold Chisel
Sublimation Markers- Pastel Chisel
Protective Paper
Heat Tape
Hero Arts: Sweet as Honey
Hero Arts: Beelieve
Hero Arts: Lavender Bunch
Canson Mixed Media Paper
Paintbrush
Heat Source: Handheld Craft Press, Home Iron, or Heat Press
Pencil
Water
Glass Mat or Palette
Stamp Positioning Tool
Step-by-Step Tutorial:
Step 1: On a piece of Canson Mixed Media Paper (mine was cut to 6” x 9”), lay your focal stamp in the middle. I’m using my Stamp Platform so that I can restamp my image if necessary.

Step 2: Stamp the floral with the Black Sublimation Ink Pad.

Step 3: Stamp the floral with a regular ink pad (any color, any brand) on a piece of copy paper and fussy cut it out. This will become a mask for the next steps.

Step 4: Place the mask on top of the original design. Begin stamping the lavender right on top. Be sure to not ink the bottom of the long bundles, as that stamp is wider than the main floral.
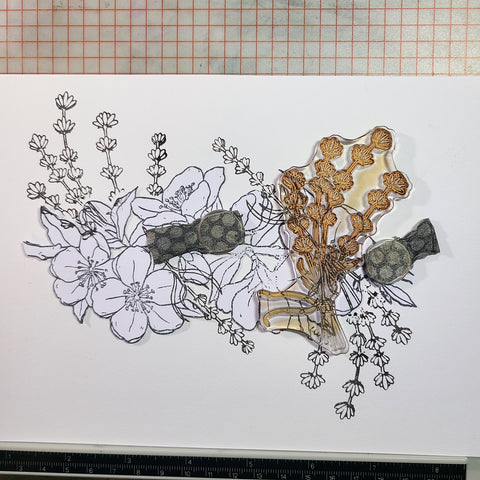
Pro Tip: You may want to use a small piece of low tack tape to affix it, but I didn’t use any. The magnets from my Platform helped to hold mine in place.

Step 5: When you are finished stamping the lavender, remove the mask. Since the mask has a degree of thickness, you may find a few broken or unstamped lines. Use your Black Fine Tip Sublimation Marker to fill in those lines.

Step 6: Stamp the bees around the flowers. I cut out and switched the position of the highest bee in my design.

Step 7: Start to color in the areas you plan on using the markers directly. I used the Yellow on the bees, Sky on the bees’ wings, Thistle on the lavender, and Cinnamon and Brown on the branch.

Step 8: For the rest of the design, we’ll be watercoloring. Scribble the Pine and Mint markers on to a glass mat or palette. Add some water to your brush and mix it with the color. Apply the Pine first, to the lower and middle portion of the leaves, and the Mint to the rest, blending the colors as you go.

Step 9: For the flowers, I colored in the center directly from the marker with the Plum, then I painted in with Violet, blending the colors, and kept it pretty light at the out parts of the petals. Do only a few petals at a time so that the markers stay wet and make blending easier.

This is what my finished design looks like. The colors are muted right now, but once we do the sublimation process, the colors will brighten right up!

Step 10: Flip your design over onto the T-Shirt and attach it well with Heat Tape. I was careful to not apply Heat Tape where the separate bee had ink, as the Tape would act as a resist.

Step 11: It’s time to make the "Sublimation Sandwich". Add a piece of Protective Paper inside the shirt (you may want to do this before you adhere your design) to prevent any ink transferring to the back of the shirt. Then, lay another piece of Protective Paper on top of the design.
Step 12: Press the design at 370℉ for 35 seconds.

Step 13: Let’s do the "Peek Test"! Lift a small area of the paper off of the shirt to be sure the design transferred well. Look at how pretty the gradation of color looks on the flowers! Everything looks good, so we can remove the paper.

Here is my T-Shirt next to the original design. I love seeing this comparison. The shirt is so pretty, and I am really glad I flipped the bee around at the top.

I am so loving the new marker colors! Having these additional options makes working with Artesprix even more fun. The stamps I used from Hero Arts were a wonderful size for this shirt.

And now I get to wear my shirt! I love that I can say I made it myself.
I even added a bee to the back as a little surprise! How would you like to get more ideas on using Artesprix’s Sublimation Ink Pads, Markers, and Paint? There’s a Facebook Group that’s just for fans of Artesprix! You can click HERE to join. Also, don’t forget to visit the Artesprix store to see all of the available blanks and bundles, so you can get started with sublimation.
Thanks so much for stopping by. Have an inspiring day!
Allison Heikkila
*Affiliate links are used in this post. That means that if you shop through these links, I may receive a small compensation, at no cost to you. For more information, please see my Affiliates page, where I also have some coupon codes.
Comments