Hi everyone! Allison here and I wanted to show you how to take advantage of our November double sided ornament blank of the Month! I had a really fun time with this Iron-on-Ink project and I think you will too. November BOTM is almost over so be sure to grab one for your nest gift giving opportunity this holiday season. Let's get started!
To see this tutorial LIVE join our Iron-on-Ink Inspirational Group. We would LOVE have you to our Artesprix Craft Room our all Iron-on-Ink BOTM projects.
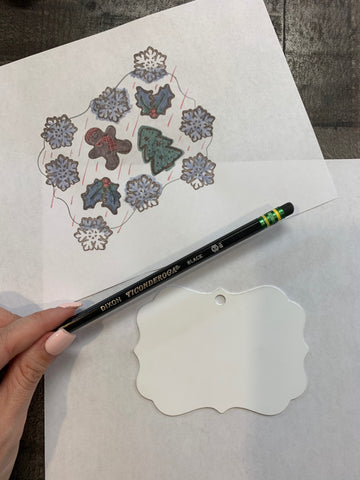
Here is what you need to get started.
Supplies:
- Markers
- Copy Paper
- Pencil
- November Blank of the Month
- Scissors
- Project Mat
- Protective Paper
- Heat Tape
- Heat Source (Press, Iron, Etc.)

Step 1. Trace your Blank on a plain sheet of copy paper.

Step 2. Prep your cling stamps on your Artesprix Acrylic Black and gently dab them on your Sublimation Stamp Pad. After your stamps are nice and inked, place them in and around your traced blank on your plain copy paper. This will be the template of your design that is transferred to your ornament.


I did two designs so I could take full advantage of the double sided ornament for Artesprix's November Blank of the Month.
Tip: It is always a good idea to go outside of your traced blank to ensure that your design is completely transferred to blank area during sublimation process.

Step 3. After you complete the stamping process design. Cover your Sublimation Stamp Pad refill and store away. Grab your markers and start coloring in your stamp designs with any colors you chose. I decided to use a Christmas themed pallet which came from the Artesprix Original Pack of Sublimation Markers, Botanical Pack, and the Pastel Pack.
Be sure if you have any text in your design that is it backwards so that after it is transferred to your blank, it reads correctly.
*Do not be alarmed if your Sublimation Marker colors come out a bit muted, they will become very vibrant after the sublimation process.*
Step 4. Now it is time to secure your Iron-on-Ink design to your blank. Use 2-3 pieces the Artesprix Heat Tape to secure your design so it does not shift during sublimation process.

Step 5. Create your Artesprix Sublimation Sandwich. Cut two pieces of Protective Paper and place your Iron-on-Ink project in between. Your design should be face down to your blank on the top on your sublimation sandwich.
Step 6. Place in your Artesprix Heat Press for 75 seconds at 400 degrees.
Step 7. Remove your blank from heat source. Without moving the heat tape, take a peak and make sure that your design transferred to your blank successfully.

Step 8. Peel off entire sheet of copy paper from blank and reveal your Iron-on-Ink design!
Step 9. Repeat steps 4-8 with your other Iron-on-Ink design to complete your double sided Artesprix November Blank of the Month ornament.


I hope you had fun with me here today! If you would like to join our Whatcha' Makin' Monday's in the Artesprix Craft Room for more BOTM projects, join us here on Facebook: Artesprix Iron-on-Ink Inspirational Group
Be sure to check out all the other recent blogs on our blog page, including Ivy's Hedgehog Snow Pet Bandana!
See you next time for December Blank of the Month project!
Best,
Allison
Comments