Hi Artesprix fans! I'm Debbie from Debbie J’s Crafting Corner. Today’s project would make a great housewarming gift, a gift for family or even a gift for YOURSELF! Who doesn’t need more potholders in the kitchen? Whether it’s to brighten your décor or to keep your hands safe when picking up hot pot, a custom potholder is a great project for anyone.
**This post may contain affiliate links. That means that I may receive compensation if you purchase through the links I have provided. The price you pay for the product or service is not higher, but I may get compensated.**

What is Artesprix Iron-on-Ink?
Artesprix Iron-on-Ink is specialty sublimation ink in craft form. Traditionally sublimation ink is found in a fancy (expensive) printer. However, Artesprix hit the crafting scene in 2018 giving Makers, like me, the ability to experience sublimation without high-end equipment. Sublimation is when ink transforms to a gas and then binds to a compatible blank once combined with heat and pressure. The big deal? Once the design is infused to the polyester coated blank or polyester fabric, it is lifetime permanent!

Supplies:
Hero Arts Hero Florals Lavender Bunch
Artesprix Sublimation Stamp Pad
Artesprix Basic Fine Tip markers
Magnetic Glass Mat from glassboardstudio.com - use discount code DEBBIE20 for 20% off
Fiskars Position & Press Stamp Block
Plain Copy Paper
Step-by-Step Tutorial:
Step 1: First let’s prep the template. I placed the Artesprix Potholder Blank onto a piece of copy paper and traced around it with a pencil. This shows me the space that I have to work within.

Step 2: Next, let’s add a design. I am loving these stencils from Hero Arts. I’m using the Hero Arts Spiral Stencil and my Ink Blending Brushes to add some yellow and orange ink from these Artesprix Sublimation Stamp Pads. I taped my stencil to the paper and added yellow in the center and orange around the edges.
You may have noticed, my stencil is smaller than my potholder. That’s okay. I’ll show you in a bit how I incorporate that into my design.
Step 3: After getting the background down, I pulled out the Hero Arts Hero Florals Lavender Bunch stamp set and the black Artesprix Sublimation Stamp Pad. I’m also using a Fiskars Position & Press Stamp Block. This will help me get my stamp positioned right where I want it. And Yes, I am stamping OVER my inked background.

Pro Tip: These sublimation inks are translucent. Which means that the darker colors will show through. Since the background is lighter, the black ink will show up perfectly!
Step 4: Because my design is smaller than the template space, and the edges of the design is irregular, I decided to trim it down. The stencil 6x6 inches, with a quarter inch blocked at the edges. My stenciling didn’t reach the edges so I trimmed it to 5x5 inches.

Step 5: Next we will secure the design to the potholder. You want to make sure to use Heat Tape, and NOT Scotch Tape or washi tape. The other tapes will NOT protect your project your heat press!

Step 6: Now we need to create the "Sublimation Sandwich”. The protective paper is used to “protect” your heat press and word surface from the ink. The ink is transferred by heat. Make your sandwich like this, Protective paper on the bottom (bottom bun), your blank with taped design (the blank is the burger, the design in the cheese), and another layer of the protective paper on top. (top bun).
Pro Tip #2: For this pressing, I’m reusing a piece of protective paper. I’m only able to do this because there is no sublimation ink on this piece. Most of the time, I do have some ink transfer to the protective paper. DO NOT reuse any protective paper that has any ink on it as it could transfer to your new project.

Step 7: Now it’s time to transfer! Always make sure that the paper with the design is closest to the heat. I set the temperature to 400℉ and time and let it heat up. Then I placed my "sublimation sandwich" on a Protective Project Mat.
I’m using a Cricut Easy Press today and it is super easy. Place the Easy Press onto the sublimation sandwich. Press the Cricut symbol to start the timer and wait 60 seconds!
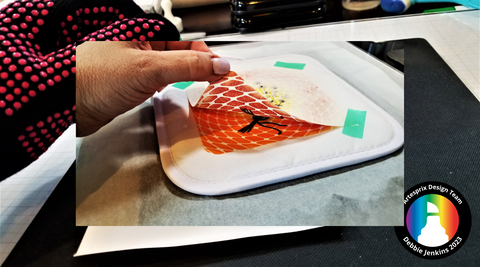
Step 8: "Peek Test" time, this can be a project saver! Before removing any tape, peel back a small part of your design to ensure the transfer was successful.
Step 9: Once you confirmed your transfer was successful, remove your design for the big reveal!

This turned out so cute! I love the bright summery colors and the lavender is a perfect touch for your kitchen. Now I have to decide whether to keep it, or to give it away! You could create something similar to match your kitchen colors. How awesome!
I really appreciate you hanging out with me today and would love to see what you create using your craft supplies and Artesprix Iron-on-Ink!

If you do not have any in your Maker's toolbox yet, head on over to the Artesprix Shop, right now. They have a "Starter Kit" that I highly recommend. Share your Artesprix projects with us by using #Artesprix and #IrononInk or post it to the Artesprix Facebook Group.
Because, if I can make it, You Can too!
Big Hugs!
Debbie Jenkins
**This post may contain affiliate links. That means that I may receive compensation if you purchase through the links I have provided. The price you pay for the product or service is not higher, but I may get compensated.**
Comments